Playing Android with Firebase ML kit, Tensorflow Lite and ARCore 2
Object detection and image classification with Firebase ML kit
In the previous post, I have gone through running custom image classification model on Firebase ML kit. It was just classifying the whole camera screen. In the real world, the camera takes a bunch of noises in one image. On the other hand, the object you want to focus on is only a portion of the whole image. In order to focus on the object, we use object detection.
First chapter: Playing Android with Firebase ML kit, Tensorflow Lite and ARCore 1
Firebase ML kit object detection
While there are plenty of methods to utilize object detection, Firebase ML kit provides a pretrained one ready to use as is. It is provided as an API, and you can just implement in Java or Kotlin to start the object detection.
The object detection can run on streaming as well as single focused detection. It can detect multiple objects or single object, and can be executed with classifier, depending on how you build the option.
class ObjectDetector(private val mode: Int,
                     private val enableClassification:Boolean,
                     private val multipleDetection: Boolean,
                     private val awaitMilliSeconds: Long) {
    private val TAG = "ObjectDetectorProcessor"

    private var options: FirebaseVisionObjectDetectorOptions? = null
    private var detector: FirebaseVisionObjectDetector? = null
    private var detectorName: String = "ObjectDetector"
    var initialized = false

    init {
        generateName()
        configureOptions()
        initializeObjectDetector()
        initialized = true
    }

    private fun configureOptions(){
        options = when(multipleDetection) {
            true -> when(enableClassification) {
                true -> FirebaseVisionObjectDetectorOptions.Builder()
                    .setDetectorMode(mode)
                    .enableMultipleObjects()
                    .enableClassification()
                    .build()
                false -> FirebaseVisionObjectDetectorOptions.Builder()
                    .setDetectorMode(mode)
                    .enableMultipleObjects()
                    .build()
            }
            false -> when(enableClassification) {
                true -> FirebaseVisionObjectDetectorOptions.Builder()
                    .setDetectorMode(mode)
                    .enableClassification()
                    .build()
                false -> FirebaseVisionObjectDetectorOptions.Builder()
                    .setDetectorMode(mode)
                    .build()
            }
        }
    }

    private fun initializeObjectDetector(){
        detector = when (options){
            null -> FirebaseVision.getInstance().getOnDeviceObjectDetector()
            else -> FirebaseVision.getInstance().getOnDeviceObjectDetector(options!!)
        }
    }
}
To run the object detection, just at I did in the previous post, I call the detection from ImageAnalisys.Analyzer .
MLActivity.kt
val imageAnalysis = ImageAnalysis(analyzerConfig)
imageAnalysis.analyzer = ImageAnalysis.Analyzer {
               image: ImageProxy, rotationDegrees: Int ->
                 objectDetection(image, rotationDegrees)
        }CameraX.bindToLifecycle(this, preview, imageAnalysis)
The input to the object detection is in FirebaseVisionImage format and the output is FirebaseVisionObject . For the input, since the CameraX provides ImageProxy and rotationDegrees , you have to convert it to FirebaseVisionImage . The Firebase has API for the converting, used like below.
@RequiresApi(api = Build.VERSION_CODES.KITKAT)
fun imageFromMediaImage(mediaImage: Image,
                        rotation: Int):FirebaseVisionImage {
    return FirebaseVisionImage.fromMediaImage(mediaImage, rotation)
}
You can take the FirebaseVisionImage and process it in the detection.
@SuppressLint("UnsafeExperimentalUsageError")
fun processImage(image: FirebaseVisionImage): Task<List<FirebaseVisionObject>> {
    if (!initialized || detector == null){
        initializeObjectDetector()
    }
    return detector!!.processImage(image)
}

@SuppressLint("UnsafeExperimentalUsageError")
fun processImageAwait(image: FirebaseVisionImage,
                      awaitMilliSeconds: Long=this.awaitMilliSeconds): List<FirebaseVisionObject>? {
    if (!initialized || detector == null){
        initializeObjectDetector()
    }
    try{
        return Tasks.await(processImage(image),
            awaitMilliSeconds,
            TimeUnit.MILLISECONDS)
    }
    catch (ex: Exception){
        Log.e(TAG, "${ex.printStackTrace()}")
        return null
    }
}
Just like the custom model inference, the detection is asynchronous and returns Tasks<List<FirebaseVisionObject>> . You can use Tasks.await() to wait for the detection.
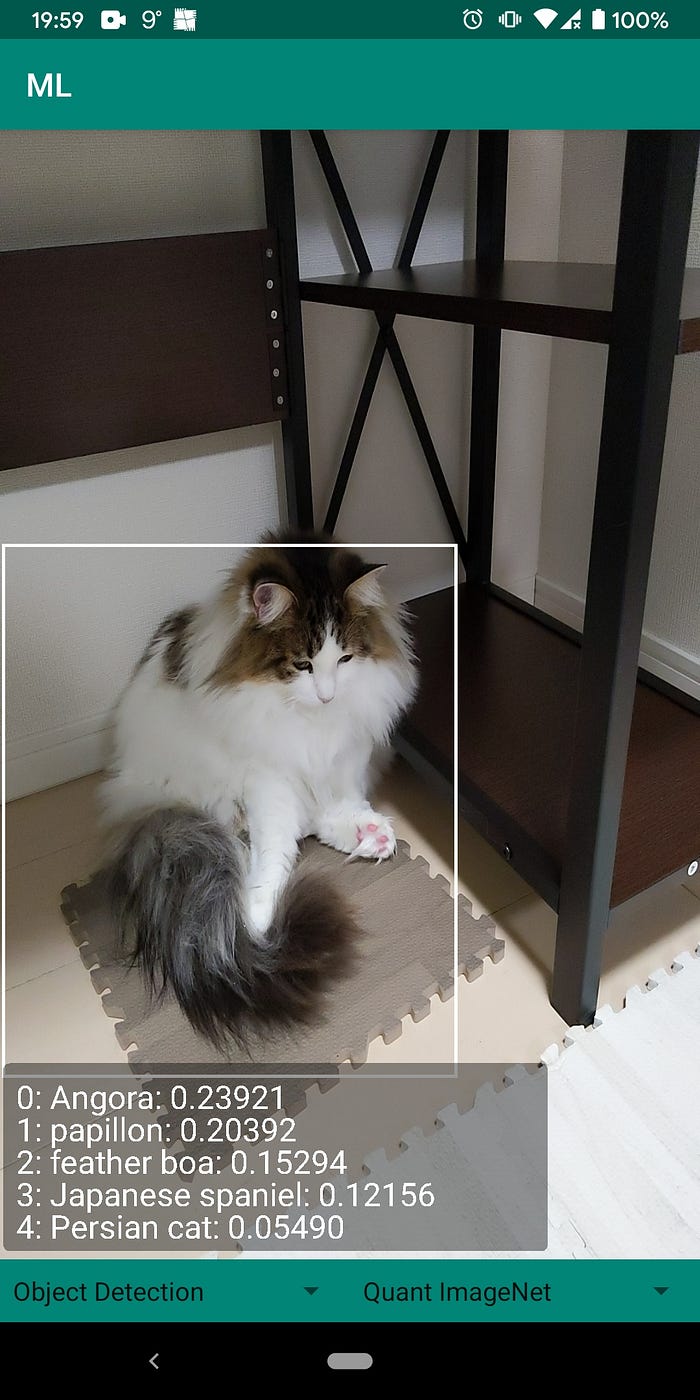
The List<FirebaseVisionObject> is a list of detected objects, containing bounding box and tracking ID. If the classification is activated, you can also retrieve label and probability. You can extract them like follows:
// The list of detected objects contains one item if multiple object detection wasn't enabled.
for (obj in detectedObjects) {
    val id = obj.trackingId       // A number that identifies the object across images
    val bounds = obj.boundingBox  // The object's position in the image

    // If classification was enabled:
    val category = obj.classificationCategory
    val confidence = obj.classificationConfidence
}
To visualize bounding box on the detected object, you have to use GraphicOverlay over the camera vision.
It is also possible to combine with the ML custom model.
Combination of object detection and custom model classification
How can we run object detection and image classification? Surely you can use the classifier provided by the Firebase object detection, though it is just too easy solution. Here, I would like to show the combination with a custom model.
In the last section, we succeeded in getting detected objects. Since the FirebaseVisionObject contains bounding box for the object, we can crop an image from the FirebaseVisionImage .
@RequiresApi(api = Build.VERSION_CODES.LOLLIPOP)
@Throws(CameraAccessException::class)
fun makeBitmapFromObject(firebaseVisionObject: FirebaseVisionObject,
                         firebaseVisionImage: FirebaseVisionImage,
                         matrix: Matrix?=null,
                         filter: Boolean=true): Bitmap{
    return Bitmap.createBitmap(
        firebaseVisionImage.bitmap,
        firebaseVisionObject.boundingBox.left,
        firebaseVisionObject.boundingBox.top,
        firebaseVisionObject.boundingBox.right - firebaseVisionObject.boundingBox.left,
        firebaseVisionObject.boundingBox.bottom - firebaseVisionObject.boundingBox.top,
        matrix,
        filter
    )
}
Now you have a bitmap focusing the object, you can take it as input to the image classifier, and extract the results.
MLProcessor.kt
fun classifyFromDetectionAwait(image: ImageProxy,
                               rotationDegrees: Int,
                               overlay: GraphicOverlay,
                               objectDetectAwaitSecond: Long){
    val firebaseVisionImage = FirebaseVisionImageUtils
        .imageFromMediaImage(image.image!!,
            FirebaseVisionImageUtils.getFirebaseRotation(rotationDegrees))
    var detectedBitmap: Bitmap? = null

    val detectedObjects = objectDetector!!
        .processImageAwait(firebaseVisionImage, objectDetectAwaitSecond)
    if (detectedObjects == null){
        return
    }

    overlay.setConfiguration(firebaseVisionImage.bitmap.width,
        firebaseVisionImage.bitmap.height,
        Color.WHITE)
    val list = mutableListOf<BoxData>()    for (obj in detectedObjects!!) {
        detectedBitmap = FirebaseVisionImageUtils.makeBitmapFromObject(obj,
            firebaseVisionImage,
            null,
            true)

        val classified = classifierInterpreter!!
            .classifyAwait(detectedBitmap)        val results = classifierInterpreter!!
            .extractResults(classified!!)
        list.add(BoxData(results, obj.boundingBox))
    }
    overlay.set(list)
}
The code above runs object detection, classification and visualize the bounding box with classification.
Is object detection always the best solution?
Object detection is powerful if run in realtime with not sure of where the object is. On the other hand, if you know where an object is, it does not worth running it, for computational resource. To focus on an object you know where in a camera interface, the thing you can do is, simply, draw a rectangle over the object.
This doesn’t really matter with the machine learning, it is more of Android view development.
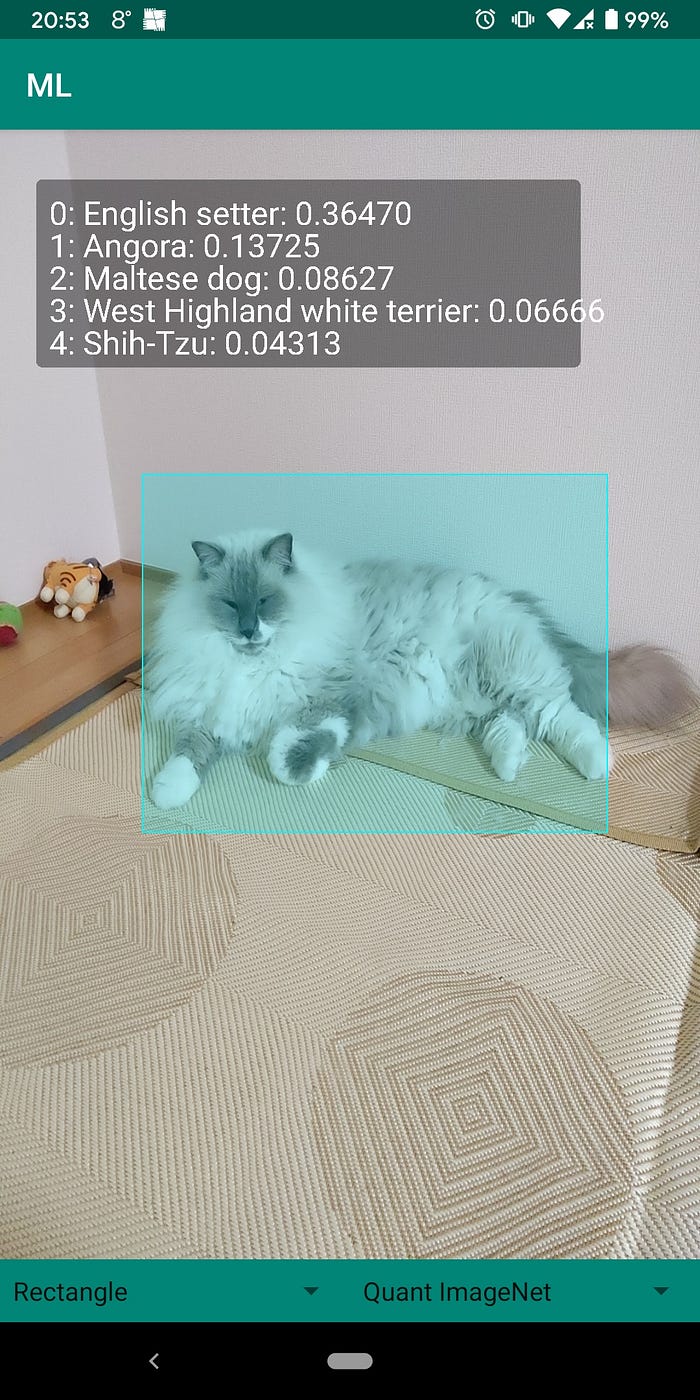
After all, running object detection or rectangle overlay to classify image can be seen in the movie here:
What’s next?
Now we are sure how to use Firebase ML kit to detect and classify image, next I am going to apply segmentation to augment camera view.
Playing Android with Firebase ML kit, Tensorflow Lite and ARCore 3
You can find the whole code of this AI and AR toy in the repository.